Free Craft Project
Clay Coil Pots
This type of coil clay pot is a classic craft project and very easy to make. Plus, it's a great opportunity to get the kids involved. It's fun, it's safe, and it will keep them entertained!.
Materials
- kneaded clay
- butter knife
- string
- pencil
- ruler (or other straight edge)
- slip (watered down clay)
- poster paints
Instructions
Make several clay worms, first by rolling a fair amount of clay between your palms, and then placing it on your flat work surface and rolling back and forth slowly. You want to create worms that are approx. 1/4" to 1/2" in diameter and 10" long.
Bottom
Take one worm and make circle (Figure 1), using slip to secure the ends to one another. Take another worm and tightly coil it inside the circle (Figure 2). If you need more clay to complete the entire coil, use part of another worm and simply attach the ends with slip, cutting off the excess.

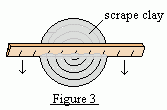
 Using a ruler (or similar straight edge), gently scrape across the combined coil and circle to flatten the surface (Figure 3). Finish smoothing out the surface with your fingertips, dipping them in water if necessary.
Walls
Apply slip to the top outer edge of the round bottom piece you just made.

Place a worm atop this outer edge (Figure 4), pressing it firmly against the bottom and then scraping the clay downward with your fingertips to seal the gap between the bottom and this first coil. When you reach the starting end of the worm, allow the coil to overlap and continue on around. This begins to form the "wall" of the pot. Scrape (work) the clay downward to seal the gap between the bottom and the first coil.

Continue placing worms one on top of another, building the wall upward (Figure 5). Remember to press firmly as you go. With each new row, work the clay downward to blend one coil into the previous row. Keep adding worms until you reach the height you want.
To keep the top edge fairly even, just flatten and trim down the end of the last coil.
Make sure the inside of the pot is well scraped, smoothing the surface with wet fingertips.
Note: During the scraping and smoothing, it's best to cradle the outside of pot with your other hand to prevent the walls from being pushed outward.
Finish:
Take a suitable length of string and wrap the ends around each of your index fingers (like you would dental floss). To release the pot from the table, "saw" the string back and forth, pulling toward you underneath the pot. If you need to even out the top edge, turn the pot upside down and press firmly against the work surface. Then just smooth and shape it with wet fingertips.
Allow to dry completely before painting. Two coats of paint should do nicely.
Optional
If you would like to have a flower pot instead, do one of the following while the clay is still wet:
Make 3 or 4 holes in the bottom by pushing a pencil or wooden dowel through the bottom of the piece before allowing it to dry.
Or...
Make several knife slits on the bottom of the piece and then spread them open slightly. Then, add one worm circle on the bottom (so it's just inside the outer edge of the pot) to allow for proper drainage.
Note: To use this for actual planting, you will need to coat both the inside and bottom of the pot with some sort of waterproof sealer.


