Free Craft Project
Quilled Flower Hat
If you're into quilling, this quilled flower hat should give you a bit of a challenge. Takes more time than some of the small quilling crafts, but that's what's so great about it.
Materials
- Qulling tool
- Quilling board
- Glue
- Straight pins
- Large coffee mug or any circular object that is approx. 3-1/4" diameter
- Aspirin bottle or any circular object that is approx. 1-3/4" diameter
Instructions
Note: Rather than use a coffee mug or aspirin bottle, you can simply create the same size circles on your quilling board.
Using 8" strips of paper, make the following scrolls. Rather than by color, the quantities are listed according to individual rows. You may need more or less scrolls than what is listed. Everyone creates different sizes when working with loose scrolls.
 Hat Brim
- 26 loose scrolls
- 15 loose cat eyes (marquise)
- 15 loose scrolls
Hat Crown
- 31 tight scrolls
- 12 loose scrolls
- 5 loose cat eyes (marquise)
- 1 very loose scroll
Crown Wall
- 21 loose eyes
- 21 loose eyes
Creating the Brim
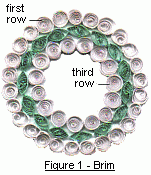
Place coffee mug upside down on the quilling board. Glue and pin 26 loose scrolls around the cup making certain they touch one another. Allow to dry before removing cup.
On the inside of that first row, glue and pin 15 loose cat eyes to create a second row. Then use the 15 loose scrolls to create a third row inside the second one. Allow to dry.
Note: If there is a gap at the end of a row, you can either take out the last glued scroll and create a larger loose scroll, or you can fill the gap with an eye scroll.

Creating the Top of the Crown
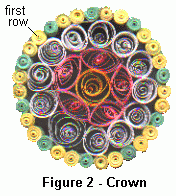
Place aspirin bottle upside down on the quilling board. Using it as a guide, glue and pin 31 tight scrolls snugly against it, making certain the scrolls are touching. This is your first row. Allow to dry and remove the bottle.
Glue and pin 12 loose scrolls on the inside, creating a second row. Glue and pin 5 cat eyes for the third row.
Make one loose scroll large enough to fill in hole that is left. Glue and pin. Allow to dry.

Creating the Crown Wall
This next part takes a bit of patience and a steady hand.
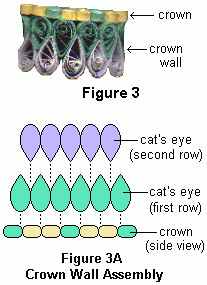
After the crown is dry, remove all the pins and turn it upside down. Glue the 21 eyes all the way around the top of the outer edge of the crown (Figure 3A). Make certain the eyes are close together with the points stricking straight up (like sharp teeth). Allow to dry completely.
With the points straight down this time, glue a second row of eyes, placing each one in between the ones on the first row. Allow to dry.
Joining the Brim and the Crown
Place the brim of the hat rightside up on the quilling board. Glue the crown on the brim (centered). The crown will slightly cover the third row of the brim.
Decorate with quilled or satin flowers and ribbon.


